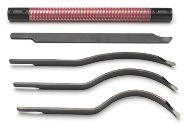
The Complete System contains three curved D2 HSS blades for cutting bowls with diameters from 4" to 14", one straight blade for basic coring, a handle, special 1" diameter tool post, three larger, thicker blades for releasing bowl centers up to 18" in diameter and extension handle. Besides turning wider bowls, the Complete System is also capable of turning out deeper blanks. The special tool post is designed to not only guide the curved tools through the blank, but it also holds the tool in the proper upright position and protects against dangerous catches.
Guide for Use
This system was originally designed as a bowl center saver. This means that several bowls can be turned from one piece of wood. This not only extends the usefulness of valuable wood, but it also allows a much more rapid removal of bowl interiors. However it is also very valuable as a device for many other avenues of creative turning. For instance… 1. Make mirror or picture frames and rings for inlays, etc. 2. Make nests of dishes from a single blank, the backside of one dish producing the inside of the next. 3. The curved radius blades can produce multi-walled or captive vessels. Additionally, these walls can be carved or textured for many interesting effects. CAUTION! Woodturning is a potentially hazardous activity. Observe all normal wood- turning safety procedures when using the Kel McNaughton Centre-Saver System, along with those specific to this product. This woodturning accessory is intended only for use by competent, experienced, advanced wood turners! The heart of the system is the Tool Post, which gives complete freedom for the turner to choose the angle of presentation. The same post will also accept three different sizes of blades, miniature, standard and large. The System can be used with either left or right handed blades, which means that turning can be either inboard or outboard. Some of the many advantages of the system: * Quick and easy to assemble. * Super Long-life blades. * Saves centres up to 450mm (18") in diameter. * Work can be secured with tailstock for added security. * Can be used for regular parting. * Maximum utilization of exotic/unusual wood.
Assembling the tool post
1. Insert the turned down section of the column through the bottom of the bored out holed of the support arm and push it through so that the long base of the arm rest on the shoulder of the column.
2. This pushed through part of the column can now be inserted into bored hole of the 3 pinned gate.
3. Push through so that the bottom of the gate touches the top short flat of the support arm. For this to happen the small brass stop pin must clear the support arm. It can only do this if it is to the for or front arm. In doing so, it ensures the gate will face in the correct direction, i.e. that the elevated face/ level of the gate will always be in a forward position.
4. The gate fits over the column to give a suction fit. This can be further strengthened with a grease seal. To achieve this, pack the small machined groove at the top of the column roughly three quarters of the way around with grease before inserting the column into the gate. Leave 1/4 clear for the air to escape when the column is inserted. Rotate gate to spread grease. Prevent rusting with oil or similar product.
Using the System
1. Securely fasten blank to face plate or chuck.
2. With normal woodturning tools shape the exterior to final form and level face of bowl blank. Stop the lathe. It is recommended that the work be further secured by use of the tail stock. This is particularly necessary with a large or difficult blank. Only use chucks or faceplates that are adequately strong.
3. Replace the tool rest with The Kel McNaughton tool post. Set close to but with adequate clearance from the bowl face.
4. Locate a handled Kelton Bowl Center saving parting tool in tool post by passing it under the cross brace and between the support gate/pins. With the handle fully raised so that the blade presses upon the cross brace. The post height should be set so that the cutting tip is at the same height or just slightly higher than the bowl center. (small, 26 x 6mm, blades are for the higher slot of the gate and the large, 32 x 7mm, blades are for the deeper slot)
5. Swivel tool around to give chosen approach angle for blank removal
6. With lathe set at a safe speed, carefully advance blade into the work until the required distance for the blank removal has been achieved. Keep the tool released simply by turning the gate a degree or two by hand. Should it be necessary, small back and forth sideways movements of the handle (fishtailing) serve to widen the cut- so will cutting the tips trailing edge by withdrawing the blade and representing it. Stop the lathe before completion of the cut and tweak the saved center from the blank. “Practice makes perfect.”
7. Shavings build up along the blade during deep cuts can be removed by withdrawing the blade slightly and reinserting or by stopping the lathe and prizing out.
8. Friction reducing substances, e.g. Teflon, when applied to the face of the gate, between the pins and along the blade can serve to increase ease of blade travel.
9. Only use the blades when supported by a Kel McNaughton tool post.
10. Only use the Kel McNaughton System on adequately strong lathes. Weak tool rest holders should be replaced with ones of sufficient strength.
11. As a safely measure, it is recommended that lathe drive belts be loosened to allow pulley slippage in the event of a “catch” or similar.
12. Vibration. The system works best when it is on lathe structures that are free of vibration. A lack of rigidity will markedly reduce its efficiency and effectiveness
13. Generally, for safety and ease of use it is recommended that the handle be held at its end with the right hand. As well as allowing for ease in raising the handle so that the blade is brought and kept in contact with the cross brace. It also has the added safety feature of distancing the turner from the work piece.
14. When learning to use the system, especially the correct aiming of the blade, choose simple less expensive wood blanks.
15. Do not rush. Remove shavings before they build up. This will prevent shaving build up along the blade and overloading. Take particular care towards the end of the cut. Here, there can be a lot of force and friction due to the length of the fibers, the reduced rate of travel and cut (surface feet per minute) and the length of overhang of the blade. Misuse in these conditions can result in a bent blade. Think SAFETY. Observe all normal safety precautions.
Tool Sharpening.
Tool sharpening should seek to retain original proportions and angles. Clearances are important. The extreme wear resistant cutting surface will not lose hardness. The tool cuts by way of the raised bar at the cutting edge. A few upward wipes with a good stone, e.g. an Arkansas diamond will maintain this fine burr. Avoid grinding until re-sharpening is necessary. Sharpen only the front surface of blades.
Remounting Released Cores
Released centers can be remounted on the lathe by turning a foot on them for gripping by chuck or attachment to a faceplate. A turned foot can be made in a number of ways- including having the face end of the bowl a) Held in a wide jaw chuck. b) Held by a vacuum chuck. c) Glued to a faceplate. d) Inserted into the remaining bowl and held in position with a tail stock.
Precautions
When using the Kel McNaugton System, observe all normal woodturning safety procedures. This accessory is intended for use only by competent wood turners. Out-ofbalance blanks can generate substantially greater forces than normal turning, make sure that your blank is reasonably balanced. This tool is intended for use only on substantial, well-built lathes. Although this accessory can be used without the tailstock, when practical, use it for additional support.
by WVWA, a chapter of the American Association of WoodturnersReturn to the Resources page

