

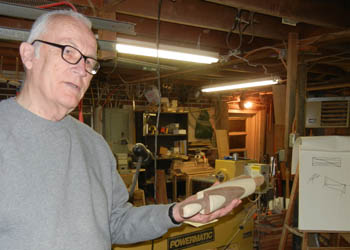
Saturday, February 25, Jim Meyer showed the Club members how he designs a segmented turning and the techniques, tools, and jigs he uses to create the blank ready for turning.
As an introduction to laminated turnings, Jim showed a rolling pin made by laminating 2 1/2 inch strips of wood together, cutting the laminated plank diagonally, and gluing the pieces together to form a parallelogram. After cutting the ends square, the blank is mounted between centers and the rolling pin is turned.
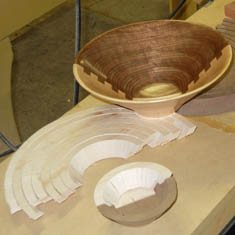
Only a few steps are required to prepare a blank for a laminated bowl using a bandsaw or a scroll saw. 1) Concentric rings are drawn on two boards. 2) Half-rings are sawn with the table set to 45 degrees. 3) Pairs of half-rings are glued together to form rings and then assembled following steps 11 through 14 for segmented turnings.
The main emphasis of the demonstration was preparing a blank to turn a segmented bowl. All the steps are explained and illustrated below
Preparing a Blank for a Segmented Bowl
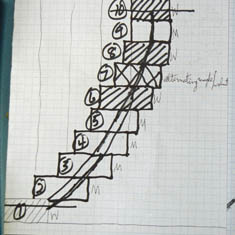
1) Design a bowl using graph paper: draw the profile of a bowl, determine the number of rings, determine the radius of each ring (r), decide the number of segments per ring (N), determine the length and width of each segment, and decide the species and alignment for each segment.
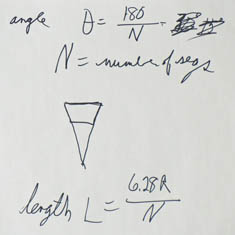
2) Calculate the angle to cut each segment: angle = 180 / N example: Each segment should be cut at an angle of 15 degrees if each ring is made up of 12 segments. 3) calculate the length of each segment: L = 6.28 r / N example: Each segment of a 12 segment ring with a radius of 4 inches should be 2 3/32 inches long
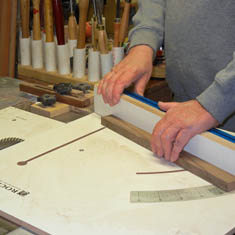
4)Set the miter gauge of your saw to 15 degrees and a stop block to cut segments of the proper length. 5) Accurately prepare blanks for cutting segments – all blanks must be identical with dimensions taken from the design. 6)Cut all the segments according to the design.
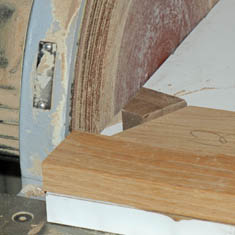
7) Sand the cut faces of the segments using a disc sander with an alignment block that has been perfectly adjusted to the proper angle. example: 45 degrees for 8 segments or 30 degrees for 12 segments. 8)Scrape any sanding fuzz along the underside of the segments.
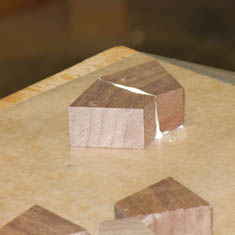
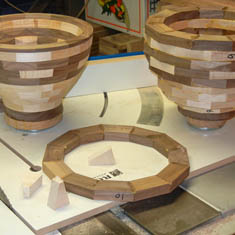
9)Glue pairs of segmentstogether using Titebond Original glue, press them together for a few seconds and place the pairs on a piece of wax paper until the glue is fully cured. Glue pairs of sgments together to form a half-ring.
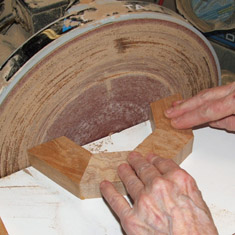
10) Lightly sand the ends of the half-rings on the disc sander. Be careful – the disc will be pulling the right end of the half- ring up and the left end down. 11) Scrape off the sanding fuzz at the ends and glue two half-rings together to make a full ring.
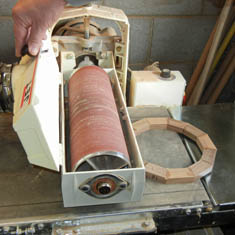
12) Sand the faces of the rings using a drum sander.
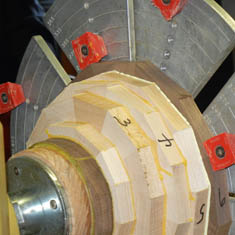
13) Screw a waste block onto a faceplate and glue a solid bottom disc to the waste block. 14) Mount the faceplate on the headstock and glue the first ring to the bottom disc using the tailstock to apply pressure. After the glue has cured for an hour, glue remaining rings being sure that they are aligned according to the design.
15) The completed blank is ready for turning.
NOTE 1): When you first make the Step 8 alignment block for sanding a ring with N segments, cut enough extra segments to make 2 half-rings. Sand the cut ends of the segments and assemble a half-ring. Place a straigtedge across the ends of the half-ring and if there is a gap, lightly sand the alignment block to make the angle bigger or smaller so the ends will align properly. Sand the segments for another half ring, assemble it, and verify that the ends are properly aligned. If they aren't, keep adjusting the angle of the alignment block until ends line up perfectly. There should be a relief angle sanded on the underside of the alignment block so sanding dust does not prevent the segment from being aligned properly.
NOTE 2): Club member Mike Salisbury uses a slightly different approach when forming the half-rings in step 9. He explains his method: "There is a faster way to do step 9: Cut all 12 segments and arrange them in a circle. Put a short piece of dowel vertically between the segments at the half-way point on each side. The diameter and length of the dowel should be approximately the same as the height of the segment. So you will have six segments, a piece of dowel, six more segments and another piece of dowel as you go around the circle. Put glue between all segments (but not where the dowels are). Put a long hose clamp or strap clamp around the circle and press it all together. The dowels will allow the segments to align even if they are not cut to the precise angle. When the glue is dry, you will have two half circles and can proceed with step 10 to get the two halves flat. I don't bother to get the angles precise as this method works well if the angles are just close."
by WVWA, a chapter of the American Association of WoodturnersReturn to the Events page